

Createone-on-one scheduling pagesso contacts can book meetings with you. If you have an assigned Sales Hub or Service Hub paid seat, you can also create a team scheduling page so contacts can book time with multiple users. Your contacts can access these scheduling pages using a meeting link. If you connect your Gmail of Office 365 calendar, scheduled meetingswill sync with your connected calendar so your appointments will always be up-to-date.
Super admins withassigned Sales Hub or Service Hub paid seats can also create and edit scheduling pages for other users by selecting the other user as the meeting organizer.
If you donothave a paid seat, you can only customizeonescheduling page with default HubSpot branding.Learn more about your subscription limits in HubSpot’s Product & Servicescatalog.
Please note:
- You can create, edit, and delete scheduling pages for other users if you have Create scheduling pages for others permissions. If you are asuper admin or user with Add and edit users permissions, you can grant a user these permissions.
- IfMeetingsdoes not appear in navigation menu underSales, make sure that your user has Sales Access permissions.
Create scheduling pages
- In your HubSpot account, navigate toSales>Meetings.
- In the upper right, clickCreate scheduling page.
- In the dialog box, select a meeting option:
- One-on-One:the contact will schedule time with just you or the user you're creating the scheduling pages for.
- Group(Sales HuborService HubStarter,Professional, orEnterpriseonly):this team scheduling page displays time slots where all selectedteam members are available to meet. Use this option to help a contact book a meeting with more than one member of your team at once.
- Round robin(Sales HuborService HubStarter,Professional, orEnterpriseonly):this team scheduling page shows the individual availability of all selected team members. Use this option to help a contact book a meeting with a team member whose availability aligns best with their schedule.
- ClickNext.
- Continue setting up your scheduling page following the steps below.
Overview
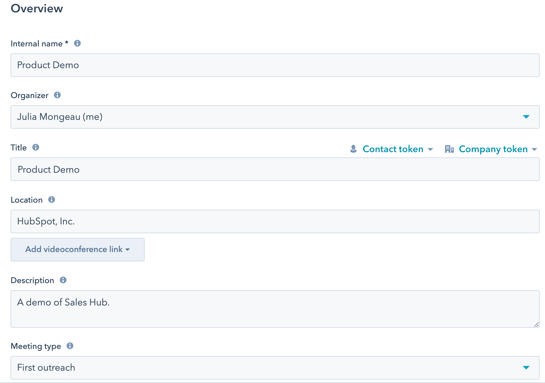
On theOverviewpage, edit the scheduling page's basic information.
- Internal name:the name that appears when the meeting link used to access the scheduling page is added to an email.
- Organizer:the mmeting owner, or the user the contact is scheduling a meeting with.
Please note:you must be a super adminwith anassigned Sales Hub or Service Hub paid seatto create scheduling pages for other users in your account, and the user must have activated the meetings tool. To create a scheduling page for another user, select their name from theOrganizerdropdown menu.
- Title:the name of the calendar event you share with your contact. For example, "Product Demo" would appear as event name. You can insert personalization tokens in the subject by clickingContact tokenorCompany token.
- Location:include information about how and where you will connect with your meeting attendee. This can be a call-in link, a physical location, etc. This location will appear in the contact's calendar invite, and the event created on your default personal calendar.
- Add videoconference link:if you're using HubSpot's integration withMicrosoft Teams, Zoom, UberConference, orGoogle Meet, you can add a videoconference link. If you have not set up a videoconference integration, you will not see this option. If you're using different videoconferencing software, and you're a developer or there's a developer on your team, learn how to use theVideo Conference Extension API.
- Description:a description of the meeting that appears in the invite when a meeting is booked. This description will appear in the calendar invite your contact receives and the event created on your default personal calendar.
- Cancel and reschedule:include cancel and reschedule links in the event description, so when a meeting is scheduled the contact can cancel or modify the date and time if needed.
- Meeting type(Sales HubProfessionalorEnterpriseorService HubProfessionalorEnterpriseonly):choose ameeting typefrom the dropdown menu.
- When you're done, clickNext.
Team members (Sales Hub orService Hub Starter,Professional, orEnterpriseonly)
Select which team members you want to include in the group or round robin meeting.
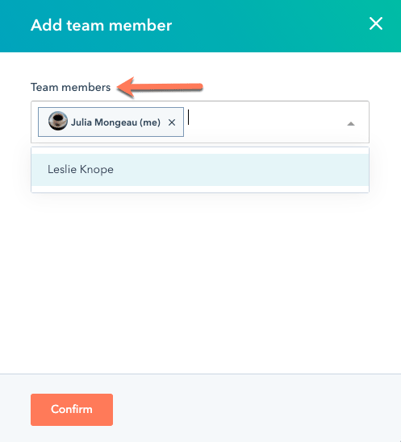
- In the top right, clickAdd team member.
- In the right panel, click theTeam membersdropdown menu and select anotherteam member, then clickConfirm. If a user's calendar is disconnected, an alert will appear below their name and theCheck availabilityswitch will be turned off.
Please note:your team member must have activated the meetings tool, which they can do by navigating to the meetings tool and clickingGet started andhave anassigned Sales Hub or Service Hub paid seatto be added to a group or round robin meeting. If a user's calendar is not connected, they can still be added to the link, but this may impact the available times that appear on the scheduling page. Learn more about howround robin and group meeting availability works.
- ClickNext.
Please note:once the scheduling page is created, the user that created a group meetingcannotbe removed as team member. However, a user that created a round robin meeting can remove themselves as a team member.
Scheduling experience
On theScheduling experiencepage, customize your meeting availability and booking form.
- At the top, edit theschedulingpage URL. This is the link that contacts will use to book meetings on your calendar, and itcannotbe edited after the link is created.
Please note:you can only use alphanumeric characters, hyphens, or underscores in the scheduling page URL. Other special characters are not supported and cannot be entered into the text field.
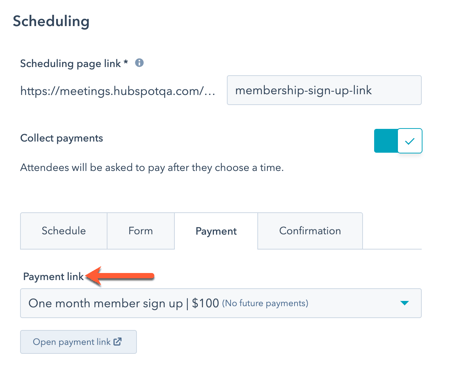
- If you're aStarter,Professional, orEnterprise user with thepayments tool set up, to add a payment linkto the scheduling page, click to toggle the Collect payments switch on.
- On thePaymenttab, click the Payment link dropdown menu and select a payment link. The checkout pagefor this payment link will appear when a contact books a meetingon this scheduling page.
Please note: currently, you can only collect payments from one-to-one scheduling pages.
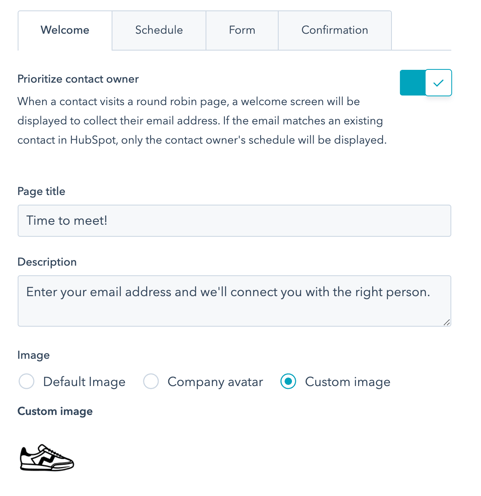
- If you're creating a round robin meeting, on theWelcometab, you can choose to display the contact owner's scheduling page. If you don't want to prioritize the contact owner's scheduling page, skip to theSchedule tab.
- To display the contact owner's scheduling page when the known contact books a meeting, click to toggle thePrioritize contact ownerswitch on. Learn more about how thissetting impacts meeting availability.
- With thePrioritize contact ownersetting turned on, a welcome screen will appear where the contact can enter their email address before accessing the scheduling page:
- In thePage titlefield, enter thetextthat appears on the welcome screen.
- In theDescriptionfield, entertextto explain why you're asking for the visitor's email address.
- To customize the image that appears on the welcome screen, in theImagesection, select animage option.
- Default image:the default meetings icon provided by HubSpot will appear.
- Company avatar:the company avatar associated with the email domain of the user who created the scheduling page. This is populated using HubSpot Insights.
- Custom image:upload a custom square image selected from the file manager. Hover over the avatar and click theeditpencil icon, then selectChange photo. In the right panel, select animage.
- On theScheduletab, you can customize the following:
- Title:enter thenamethat will appear above the calendar on the scheduling page.
- Duration:the length of time visitors can book you for. Click+ Add durationto add more options.
- Time zone:click theTime zonedropdown menu and select your time zone. This is the time zone that your availability is based on.
- Available times:use thedropdown menusto set the days of the week and duration of your available time slots. Click+ Add hoursto add additional time slots.
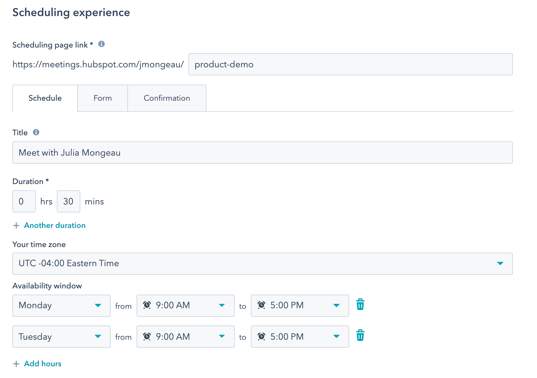
Please note:your scheduling page's available times will appear in the contact's time zone settings. For example, if the contact's computer is set to Pacific time, the times will appear in Pacific time.The contact's calendar settings determine the date and time of the calendar event sent to the contact after booking a meeting.
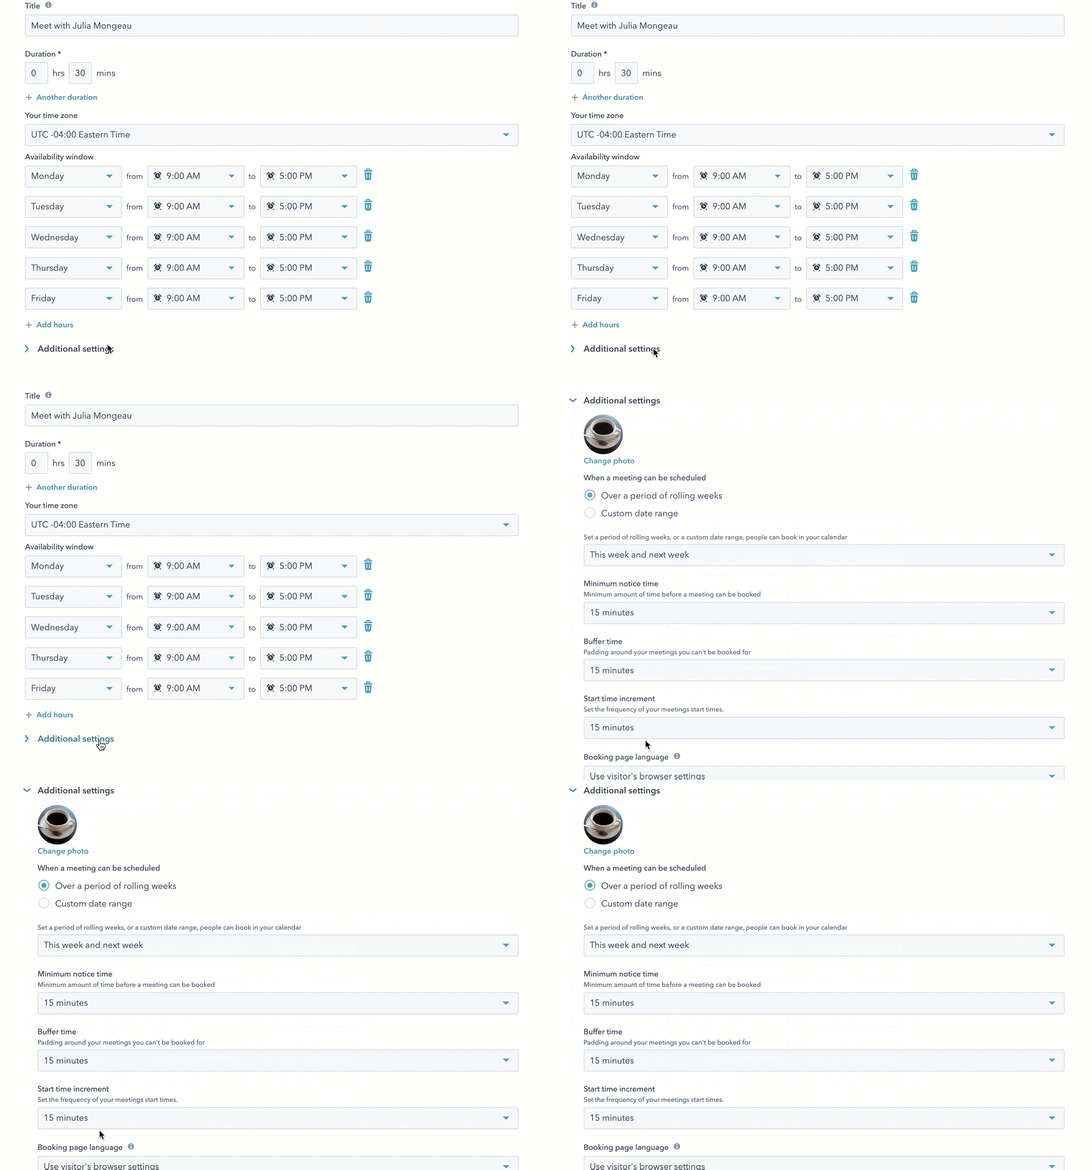
- To see additional customization options, click to expand theAdditional settings section. Here you can customize the following:
- Image:this image will appear at the top of your scheduling page. Select animage option:
- Organizer's avatar:the meeting organizer's avatar, set in theiruser profile and preferences, will appear. This option is only available when creating a one-on-one scheduling page.
- Company avatar:the company avatar associated with the email domain of the user who created the scheduling page will appear. This is populated usingHubSpot Insights.
- Custom image:upload a custom image selected from the file manager. Hover over the avatar and click theeditpencil icon, then selectChange photo. In the right panel, select animage.
- Image:this image will appear at the top of your scheduling page. Select animage option:
- When a meeting can be scheduled:enter the number of weeks from now that people can book time on your calendar. If you are creating a scheduling page for an event or conference, you can specify a custom date range for booking. Select theOver a period of rolling weeksorCustom date range(users with assignedSales Hub paid seats only) radio button, then select the number of weeks or use the date picker fields to set your time range. A custom date range cannot be longer than 10 weeks.
- Minimum notice time:click thedropdown menuto select the minimum amount of time before a meeting that someone can book time with you.
- Buffer time:click thedropdown menuto select the amount of buffer time between each of your meetings. The buffer time prevents meetings from being booked too closely together. For example, if you have a meeting from 1:00 - 1:30pm and have a buffer time of 30 minutes, the next available meeting time would be 2:00pm.
- Start time increment:set the frequency of your meeting start times. For example, if you are available between 10:00am and 12:00pm for a 60 minute meeting and your start time increment is 15 minutes, a prospect can book 60 minutes with you at 10:00am, 10:15am, 10:30am, and so on.
- Booking page language:select the language that the scheduling page should appear in. If a visitor’s browser settings can’t be detected, your scheduling page will appear in English.
- Date and time format:the date and time will be formatted in the same language selected for the booking page language.
- Click theFormtab to customize the form contacts will see when booking a meeting with you.
- By default, contacts will be required to enter theirFirstName,Last Name, andEmailwhen booking. If you are a paidSales Hub or Service Hub useryou can add additional questions. Keep in mind that any additional form fields that are added will be included in the calendar event invite and event description.
- If a form is submitted via a meetings link, a unique email address will always create a new contact, regardless of if an existing contact has a matching user token. In this case, the existing contact's email address will not be overwritten by the new email address.
Please note:
- If you're creating a scheduling page for another user who doesnothave an assignedSales HuborService Hubpaid seat, you cannot add additional questions to the form.
- If a form is submitted via ameetings link, a unique email address will always create a new contact, regardless of if an existing contact has a matching user token. In this case, the existing contact's email address will not be overwritten by the new email address.
- To add a simple text field question, clickCustom question. Enter aquestion, then clickSave. To make the field optional, clear theRequiredcheckbox to the right of the field.
- To add an existing contact property as a field, clickContact property. This allows you to add different field typesto your form. If you need to create a new property for this field, learn how tocreate custom properties. Select acontact propertyfrom the dropdown menu, then clickSave. To make the field optional, clear theRequiredcheckbox to the right of the field.
Please note:youcannotadd a file upload fieldto your meetings form.
- To add a CAPTCHA challenge to the scheduling page to prevent spam submissions, click to toggle theCAPTCHA (spam prevention)switch on.
- If you have GDPR enabledin your account, any scheduling pages created moving forward will default to GDPR ON. The scheduling page will show the default Privacy & Consent textyou have set up in your account settings. To customize yourPrivacy & Consent (GDPR) optionsfor this scheduling page, clickCustomize:
- You can capture a contact's consent to communicate to a specific subscription type, or capture legitimate interest on your scheduling page. In theCustomize marketing consentpanel, selectConsentorLegitimate interestfrom the dropdown menu.
- Consent:edit the communication consent text, then add additional subscription types/checkboxes to allow visitors to consent to communication from multiple subscription types on a single scheduling page. Click+ Add another checkbox, then select a consent type and edit the text that will appear next to the checkbox.
- Legitimate interest:select a lawful basis from the dropdown menu. To add more subscription types so you can capture multiple subscription types implicitly, click+ Add another subscription, then click theSubscription typedropdown menu and select a subscription type. The default subscription that you select in meetings is "one-on-one" communication. It's an internal subscription type in your HubSpot account.
- Edit the scheduling page's privacy and consent text. Any changes made to an individual scheduling page'sPrivacy & Consentoptions will override the default text set in your account settings.
- To see how the consent options will render, click thePreviewtab.
- You can capture a contact's consent to communicate to a specific subscription type, or capture legitimate interest on your scheduling page. In theCustomize marketing consentpanel, selectConsentorLegitimate interestfrom the dropdown menu.
- To access additional form settings, click to expand theAdditional settingssection:
- If you do not want form fields on the booking page topre-populate with known informationwhen a contact returns to your site, click to toggle thePre-populate fields with known valuesswitch off. Turning this setting off will automatically turn off theAuto-submit form when all fields are pre-populatedsetting.
- To automatically submit the form when theform fields pre-populate with known data, click to toggle theAuto-submit form when all fields are pre-populatedswitch on.
- Users with anassignedSales Hub or Service Hub paid seatcan redirect contacts to a specific website page, landing page, or external page after they book a meeting. To customize the contact's experience after booking, click theConfirmation
- Select theRedirect to another pageoption. If you’ve installed ad network pixels, this redirect supports tracking meeting bookings with external networks like Google and Facebook.
- To select a HubSpot page, click the dropdown menu and select a page.
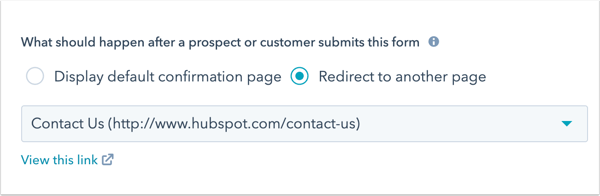
- To redirect to an external page, click Add external link. In the dialog box, enter the URL, then click Add.
- When you're done editing your scheduling options, clickNext.
Automation
On theAutomationpage, you can turn off the automatic booking confirmation email or add additional reminder emails to be sent out before the meeting.
Please note: you cannot edit the content of the confirmation or reminder emails.
- By default, a confirmation email will be sent when someone books a meeting using this scheduling page. To turn this off, click to toggle theConfirmation emailswitch off.
- To send reminder emails before a meeting, click to toggle thePre-meeting reminderswitch on.
- To select how many weeks, days, hours, or minutes before the meeting an email should be sent out, enter anumberin the text field, then click theScheduled reminder emaildropdown menu and select a time measure.
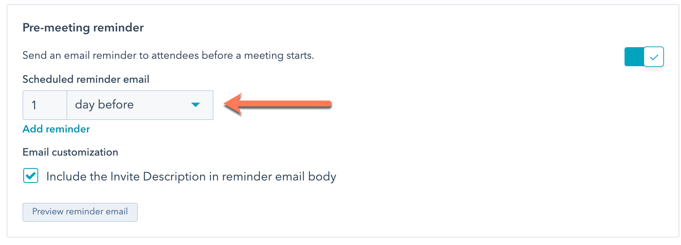
- You can add up to three reminder emails. To add additional reminder emails, clickAdd reminder. To delete a reminder, click thedelete icon.
- To select how many weeks, days, hours, or minutes before the meeting an email should be sent out, enter anumberin the text field, then click theScheduled reminder emaildropdown menu and select a time measure.
Please note:reminder emails are sent as transactional emails, even if you are not using thetransactional email add-on. These do not count towards your email sending limit.
- To include the invite description in the reminder email, select the
- Include the Invite Description in reminder checkbox.
-
- To preview the email your contacts will receive, clickPreview reminder email. The language of the email will match the language selected in theBooking page languagedropdown menu.
- ClickDone.
You can nowshare a meeting linkwith your contacts so they can access the scheduling page and book time with you. In theTypecolumn, aOne-on-One,Group, orRound Robinlabel will appear next to the meeting name, and the organizer's name will be listed below the label.
Please note:for round robin meetings, the reminder email will be sent from the HubSpot user who has been booked for the meeting with the contact, not the HubSpot user who created the scheduling page.
Users with anassignedSales Hub or Service Hub paid seatcan also customize the company logo, company information, and default colors that display on your scheduling page in your account settings. Changes made here will also apply to your documents and quotes. Learn how toedit your company branding for HubSpot's sales tools.