
There is more to operating a successful eCommerce store than just stocking it with products people want. Without an automated process, managing online markets with their bustling traffic becomes more difficult. Maximizing your eCommerce platform also involves raising brand awareness, creating a personalized customer experience, and improving landing pages.
Integrating a CRM system into an online store is one way business owners can make their lives easier. A simple automated marketing and sales process can have a profound impact on their marketing and sales activities.
As a certified local partner of HubSpot CRM, we truly believe this is the best solution for businesses in all shapes and sizes looking to automate their processes, eCommerce included. HubSpot can easily integrate with almost any eCommerce platform, which allows you to automate and manage your routine business processes like lead generation, email marketing, order management, inventory management, lead nurturing, workflow management, customer service, etc.
The focus today is on its integration with WooCommerce, one of the most popular ecommerce platforms in the world. It's easy to integrate, and there's no cost involved.
How does HubSpot integration benefit your WooCommerce store?
1. Develop a comprehensive profile of each customer
When you sync WooCommerce Contacts to HubSpot, the CRM will create detailed profiles for each contact. Furthermore, HubSpot will track a contact's number of WooCommerce orders, total order value, transaction history, and more, besides their name and email address.
The more you know about your customers, the better you can serve them, and HubSpot will definitely assist you in identifying customer behaviour in your store.
2. Drive sales
Utilize your WooCommerce store visitors' historical interactions with you to nurture them into new (or even repeat!) customers. Segmenting your visitors into various lists, such as "Leads", "Customers", and "Abandoned Carts", will help you do this and will help eliminate friction and manual workload around your team
Use HubSpot's automated workflows to send targeted marketing emails that nudge visitors into taking certain actions. It is possible, for example, to follow-up with abandoned cart visitors and encourage them to complete the checkout process.
3. Manage social media campaigns effectively
Posting and managing your social media campaigns could be done through different apps, or from one platform where you can oversee everything. Using HubSpot, you can post content (including paid ads) to multiple social media platforms simultaneously and track its performance.
Also, since HubSpot's social media features are integrated into its CRM, you can track which social posts led to which store visits and conversions. Optimize your campaigns based on this data for even more traffic and sales!
4. Monitor the performance of your WooCommerce store
Using HubSpot's ecommerce analytics, you can get a bird's eye view of your store's performance. How much revenue did your online store make this week? How about last month, or your year-to-date total? Is your website traffic up or down from the previous quarter? You don't need to guess—all you need to do is turn on HubSpot.
Once you know what's working and what's not, you can adjust your store setup, marketing emails, and social campaigns to maintain healthy sales figures.
Does HubSpot have a free version?
There are several free CRM tools available through HubSpot, including:
-
Contact management
-
Email marketing
-
Landing pages
-
Ad management
-
Data sync
Take advantage of them to test HubSpot's features and decide if they're right for your WooCommerce store. If they are, and they work perfectly for your needs, great! For now, the free plan will suffice.
Alternatively, if you want a more powerful plan from HubSpot, you can subscribe to its paid plans. Among their premium features are white-labelling and A/B testing.
However, HubSpot's pricing structures can be quite complex. You should stick with HubSpot's free tools first, and only check out its paid offerings once you're ready to upgrade.
Step 1: Installation (2 options)
The installation of this plugin is similar to that of other WordPress plugins. After downloading the plugin, you need to install it on your WordPress dashboard. There are multiple sources where you can download this plugin, including:
-
WordPress
-
HubSpot
-
MakeWebBetter
-
WooCommerce
1. Automatic Installation
WordPress handles automatic installation the easiest way possible.
-
Log into your WordPress Dashboard after downloading the plugin.
-
Click on Plugins on the sidebar.
-
To upload plugins, click Add New and then Upload Plugins.
-
Click on Install Now after choosing your downloaded plugin's .zip file from the Browse button.
-
Activate the plugin once it has been installed.
2. Manual Installation
The plugin can also be manually installed in the seller's WordPress environment. By using their favorite FTP application, they can upload our HubSpot WooCommerce plugin to the web server manually.
Manual installation involves the following steps:
-
The HubSpot WooCommerce Integration folder should be uploaded to the /WP-content/plugins directory.
-
By going to the 'Plugins' menu in WordPress, you can activate the plugin.
Step 2: Connect your HubSpot account
When you activate the HubSpot WooCommerce integration plugin, you'll see this screen asking for your HubSpot account connection:
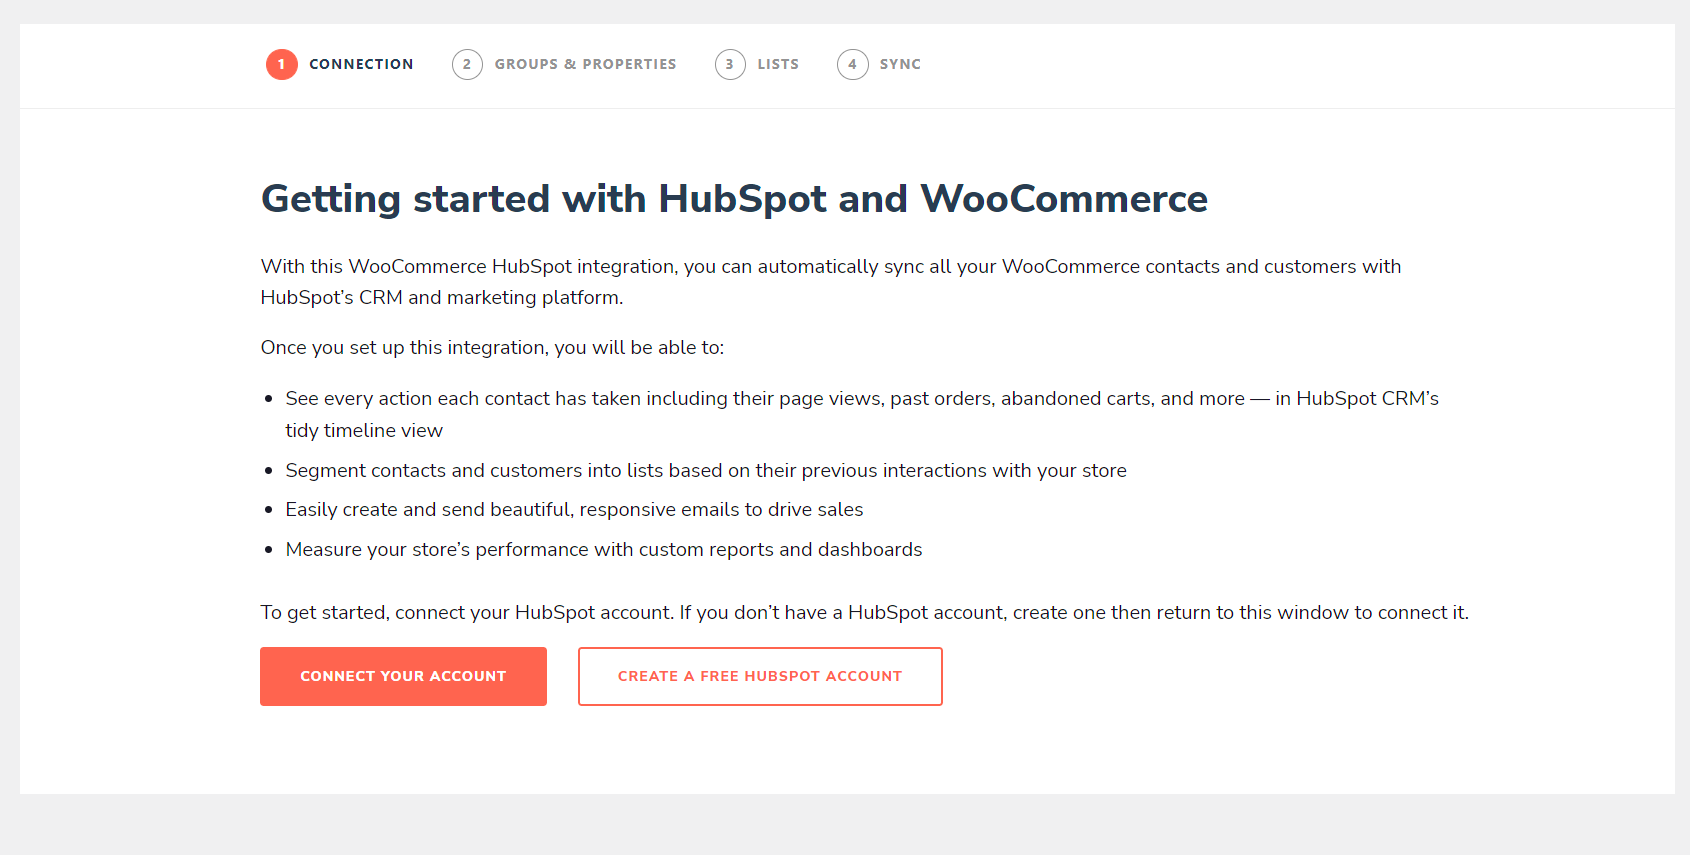
Click "Create a Free HubSpot Account" to register for a HubSpot account if you do not already have one.
If not, click "Connect Your Account" to sign in to your HubSpot account and connect it to WooCommerce.
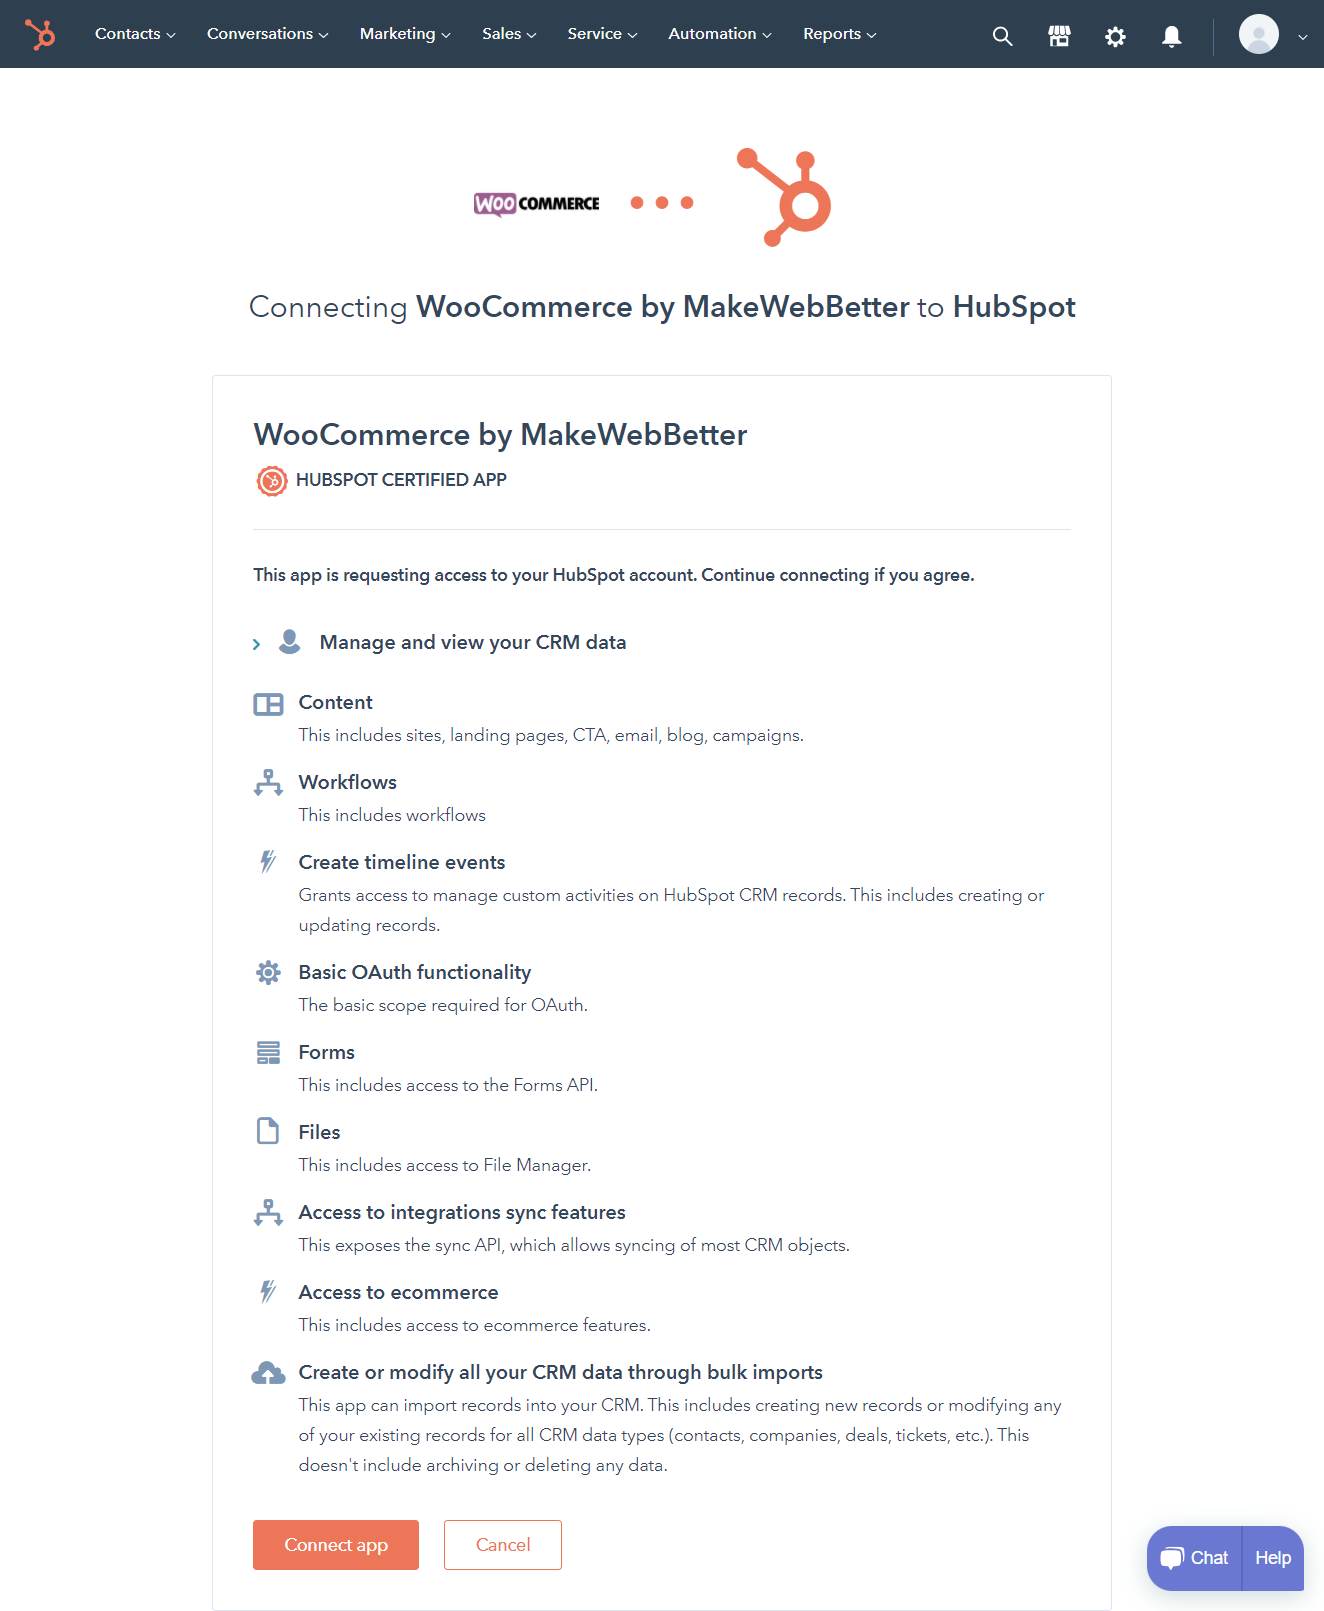
Confirm the integration by clicking "Connect app".
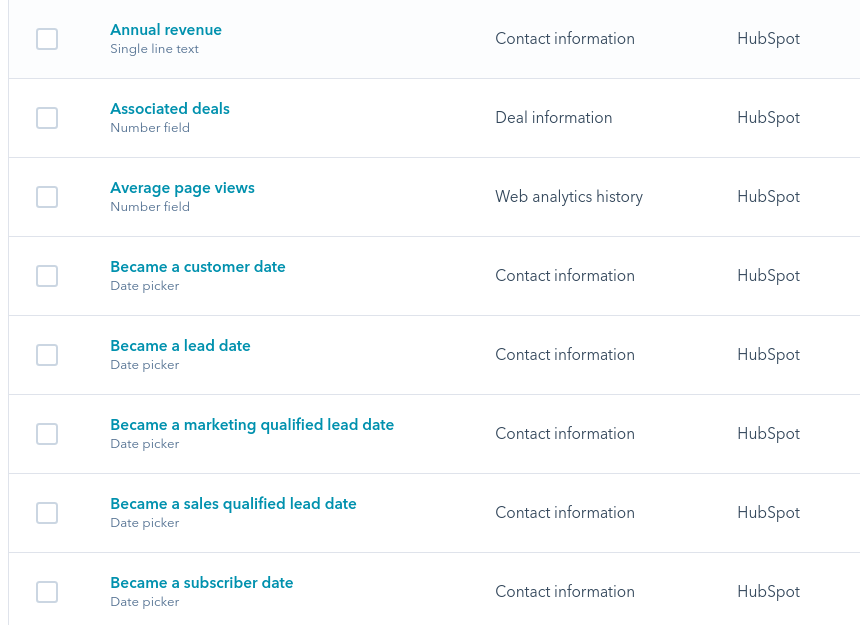
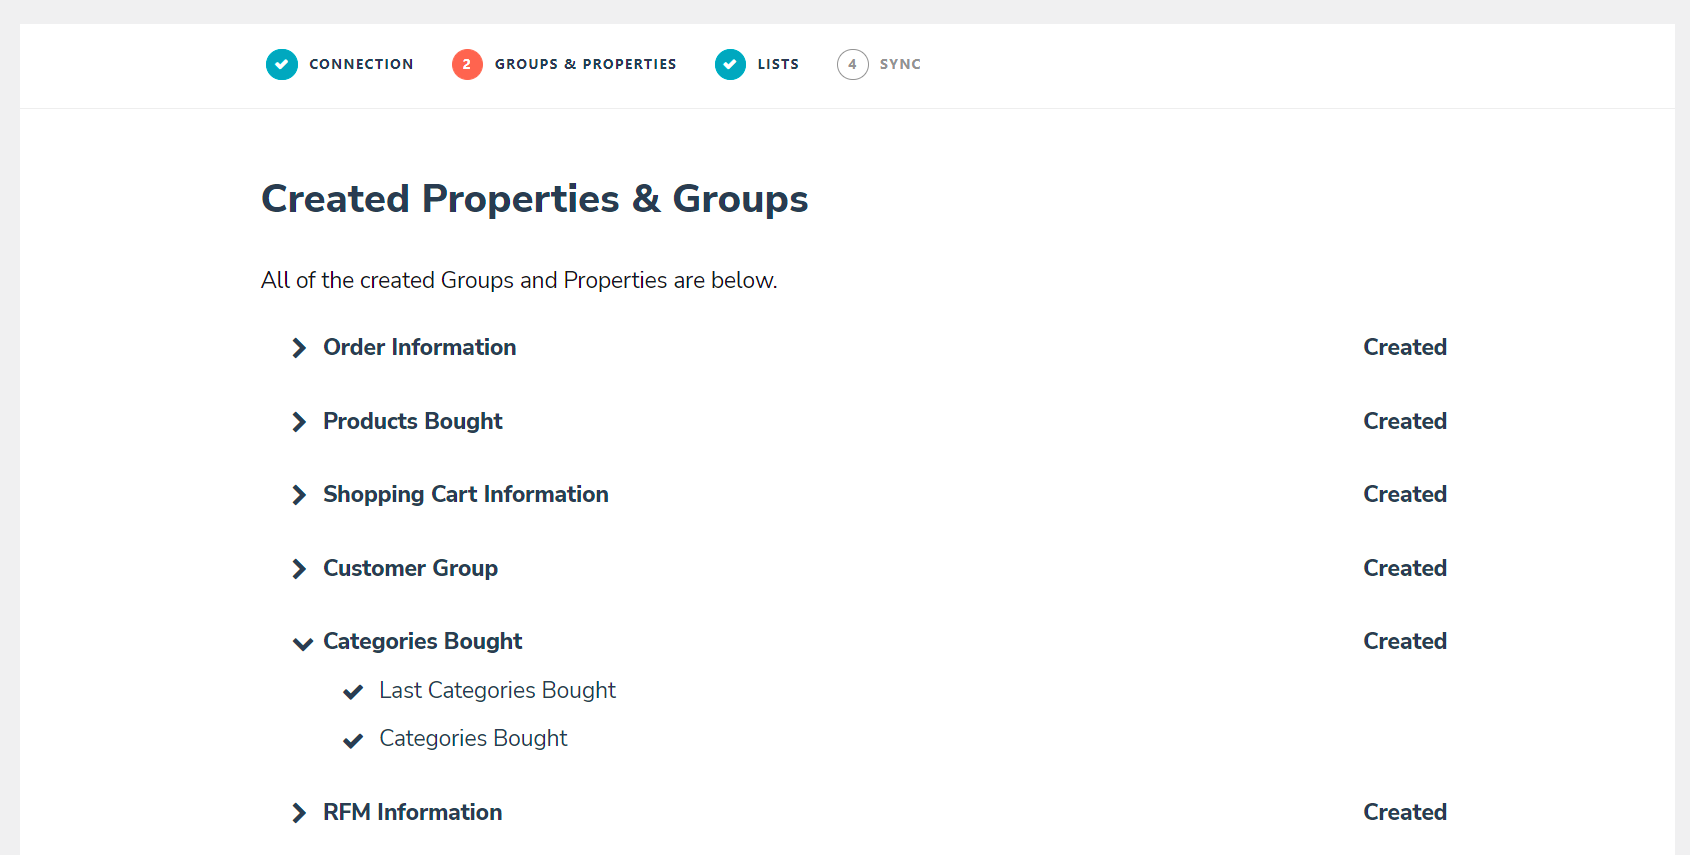
Step 3: Customize HubSpot properties and groups
The next step is to set up custom groups and properties in HubSpot WooCommerce Integration. The concept of properties and groups has already been explained.
Your business's nature can dictate the custom fields you add after creating custom groups. With these custom fields, you can capture data for your contacts, companies, tickets, and deals.
With the HubSpot WooCommerce Integration, you can create 100+ properties in just a few clicks. Located under Groups & Properties, click Manage in the Settings. You can create properties for which you want to collect data by clicking the + icon. You will see them on your HubSpot portal as soon as you click them, and when that happens, the progress bar will start running, indicating your properties are being created. Following the successful creation of the properties, you'll move on to the next step, which is creating lists in HubSpot.
You'll find all those custom properties under Settings > Properties in your HubSpot portal if you want to see them.
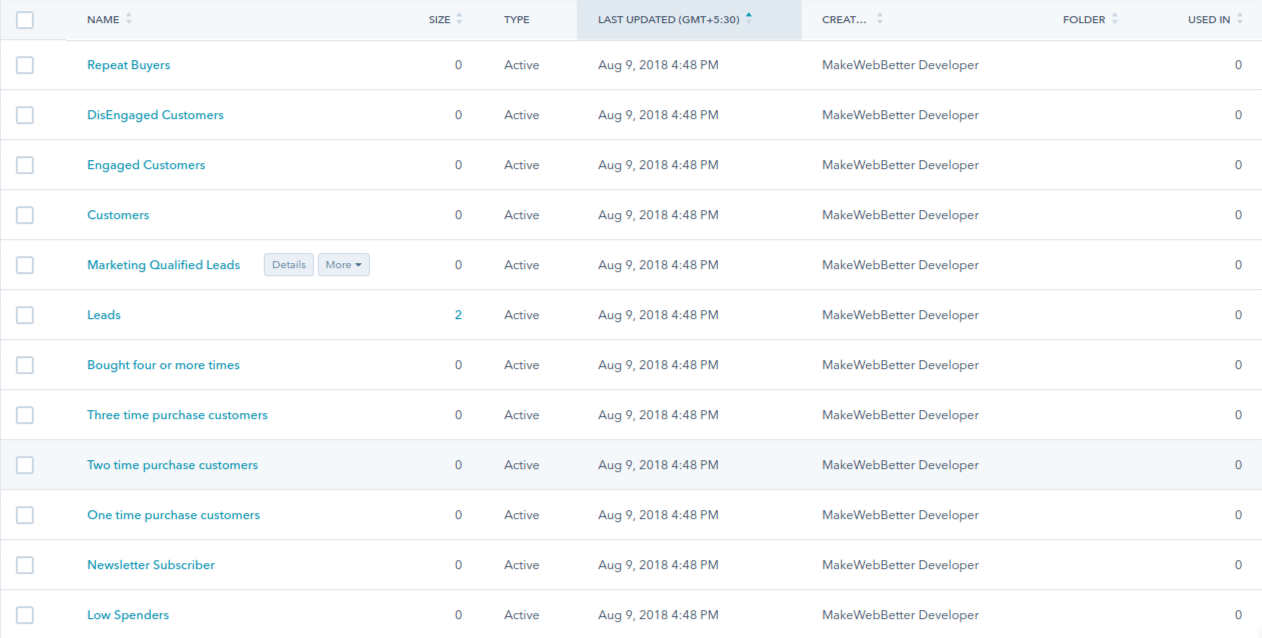
Step 4: Set up your HubSpot lists
The next step is to create lists in HubSpot. Once your contacts meet the enrollment criteria, your HubSpot smart lists or active lists automatically update. It's time to segment your audience based on their characteristics after creating custom fields and syncing your data to HubSpot.
For example, A contact who hasn't placed any orders will fall into the "Leads" category. Contacts who add items to their shopping cart without placing an order by a certain date will be segmented into the "Abandoned Cart" list.
By default, HubSpot creates these three lists:
-
Customers
-
Leads
-
Abandoned Cart

However. the HubSpot WooCommerce Integration plugin comes with predefined active lists, such as Best Customers, Loyal Customers, and Abandoned Cart Users. Once you click the create button, your HubSpot portal will display the list.
It will appear on your portal as shown in the screenshot below and begin collecting data by enrolling contacts who meet the set criteria.
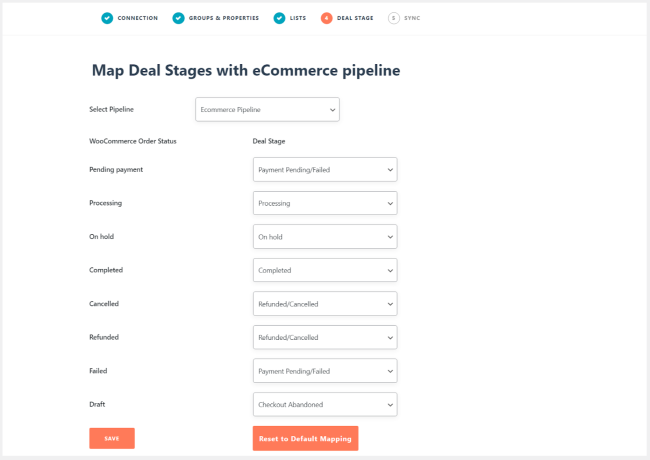
Step 5: Map Deal Stages with Pipeline
The next step after creating the lists is mapping the deal stages within the pipeline.
By clicking on the Select Pipeline dropdown, you'll be able to see all the pipelines you've created in HubSpot. Choose the deal stage you want to map.
To map WooCommerce Order Statuses correctly, select the deal stage after selecting the pipeline.
As soon as the deals are mapped successfully, click on the Save button to move on to the next step.
Reset to Default Mapping if you're not sure about the mapping.
Step 6: Data sync between WooCommerce and HubSpot
There is one last step to complete before exploring the various features this integration has to offer - syncing your WooCommerce data with HubSpot to import all your existing WooCommerce Contacts, Deals, and Products information.
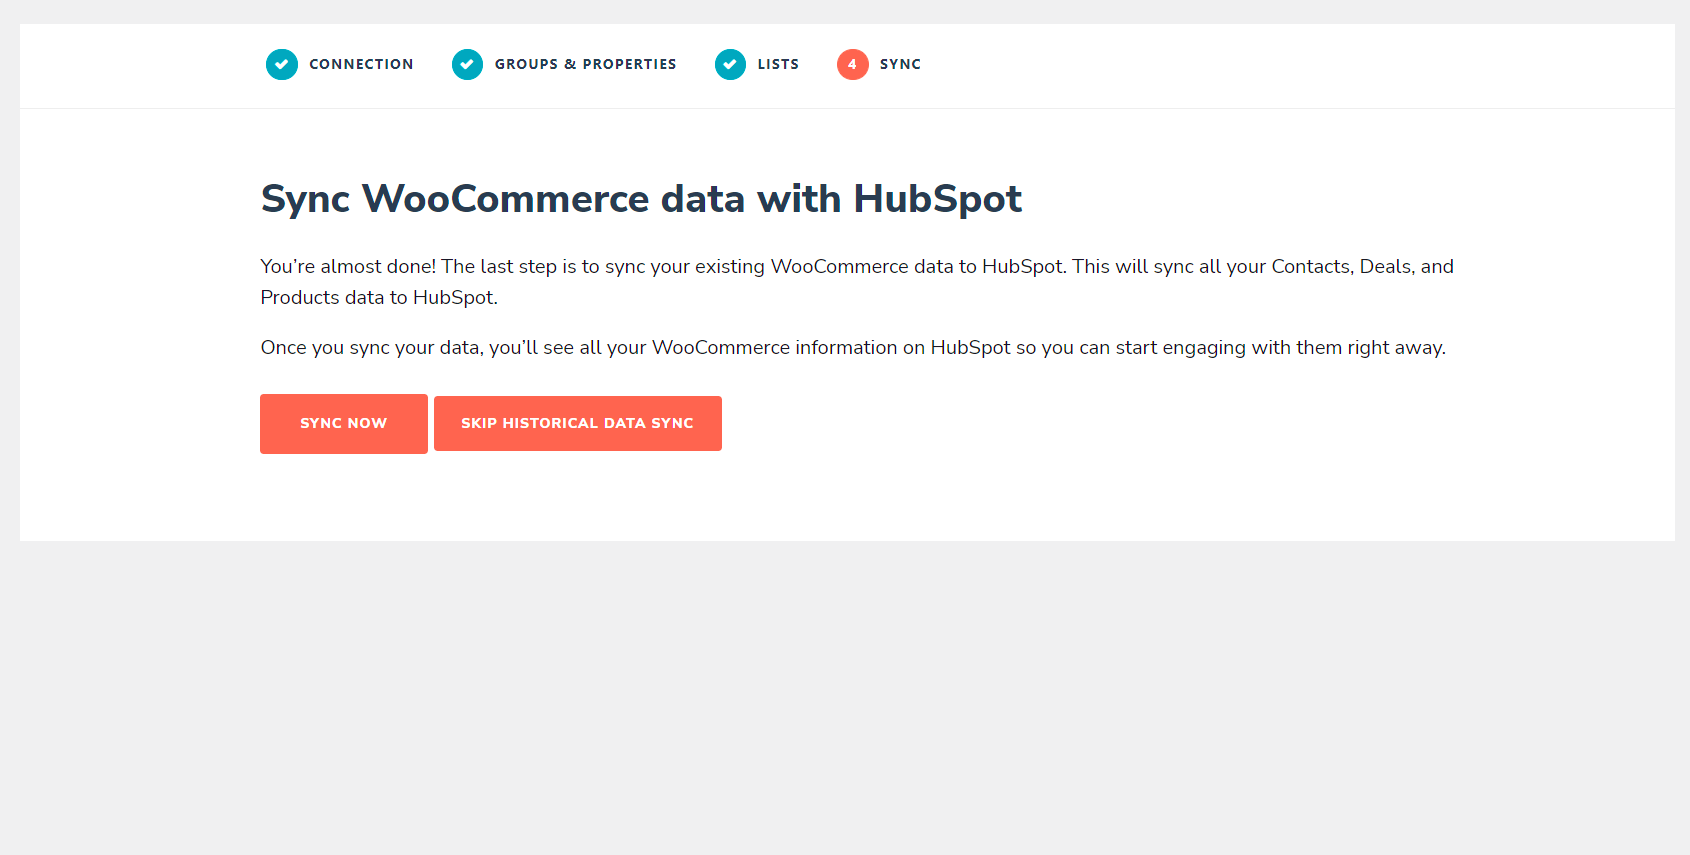
Start the sync by clicking "Sync Now". To start using HubSpot from scratch, click "Skip Historical Data Sync" to not synchronize your WooCommerce data.
You'll have the option to sign up for HubSpot's mailing list after completing the sync (or skipping it). Choosing to do this step is completely up to you.
After that, click the new "HubSpot" setting under the WooCommerce tab of your WordPress sidebar to check out your new HubSpot dashboard within WooCommerce.
Integration features
Workflows
A workflow is a series of automated actions triggered by conditions and bound to a specific group of events. By segmenting customers into useful lists, you can automate eCommerce business processes by creating inbound marketing workflows based on customer groups, RFM ratings, purchase details, and other 70+ contact properties.
It is often necessary to customize content and schedules for different customer segments. With our HubSpot integration plugin, you can create effective workflows in your HubSpot portal in a single click without applying logic.
Dashboard
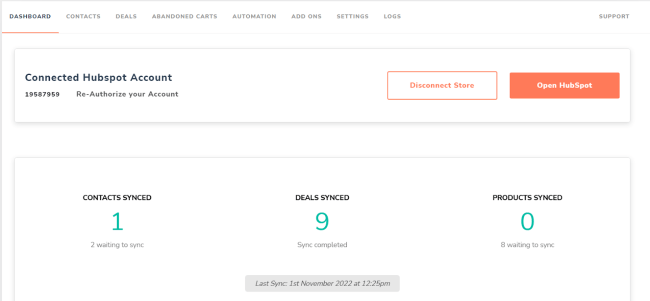
On the dashboard of this plugin, you can see the data that has been successfully synced over HubSpot. Over HubSpot, you can see how many Contacts, Deals, and Products have been successfully synced.
Contact
This setting allows you to send WooCommerce contacts to HubSpot.
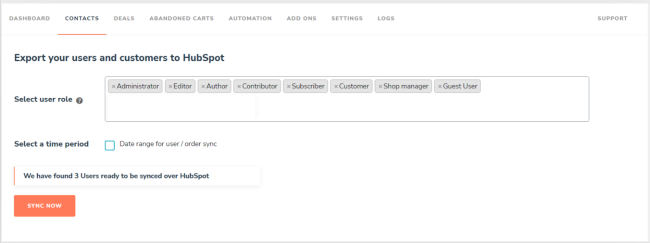
- Select User Role: Your selected user roles will be synced to HubSpot.

- Select the time period: Choose the time period for which you want to sync the data. To sync any data in that time frame that still needs to be synced, click the Sync Now button.
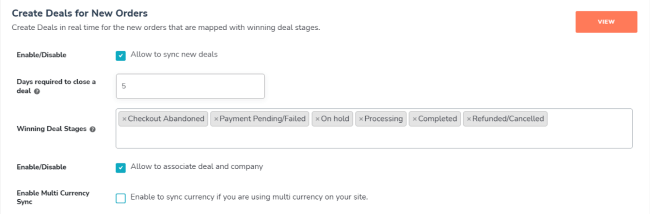
Deals
In HubSpot, WooCommerce orders become deals. A HubSpot deal is an opportunity you have with a company or contact where there is a greater likelihood for the contact to take action. A sales pipeline is created when all deal stages are aligned in one direction.

This setting provides the following:
-
Map deal stages with eCommerce pipeline: You can map WooCommerce order statuses to HubSpot deal stages defined in your HubSpot CRM's pipelines. There is already a mapping for the default WooCommerce order statuses.

-
Create deals for new orders: When a new order is placed at your WooCommerce store, enable this feature to create a new deal over HubSpot. Set the number of days needed to close a deal and select the stages of the winning deal.
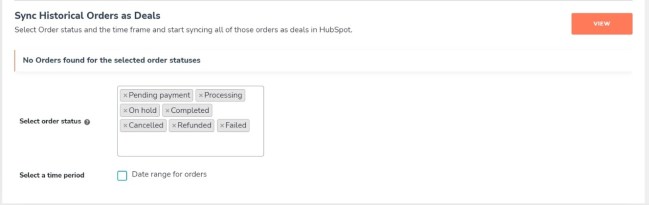
-
Sync Historical Orders as Deals: Sync your existing WooCommerce orders over to HubSpot as deals. In order to send the orders over the CRM, you must select the order statuses and the date range you want to sync.
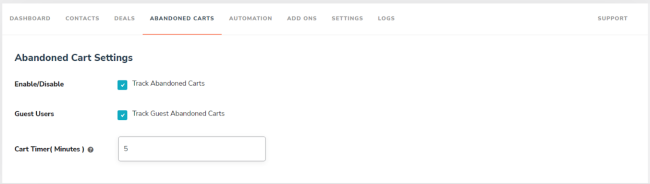
Abandoned Carts Settings
A pre-built abandoned cart HubSpot list and contact properties are automatically created in HubSpot once your WooCommerce store is connected to HubSpot. A unique Abandoned cart workflow is automatically created for you to recover revenue lost to abandoned carts. A comprehensive abandoned cart reporting feature in HubSpot allows you to retarget those inactive buyers.
To enable abandoned cart tracking and guest user abandoned cart tracking, select the checkbox. You can set a timer for abandoned carts. HubSpot will update abandoned cart data every 10 minutes if you select 10 minutes.
Visualised Reporting
Your online store's sales and marketing can be tracked through HubSpot's reporting feature.
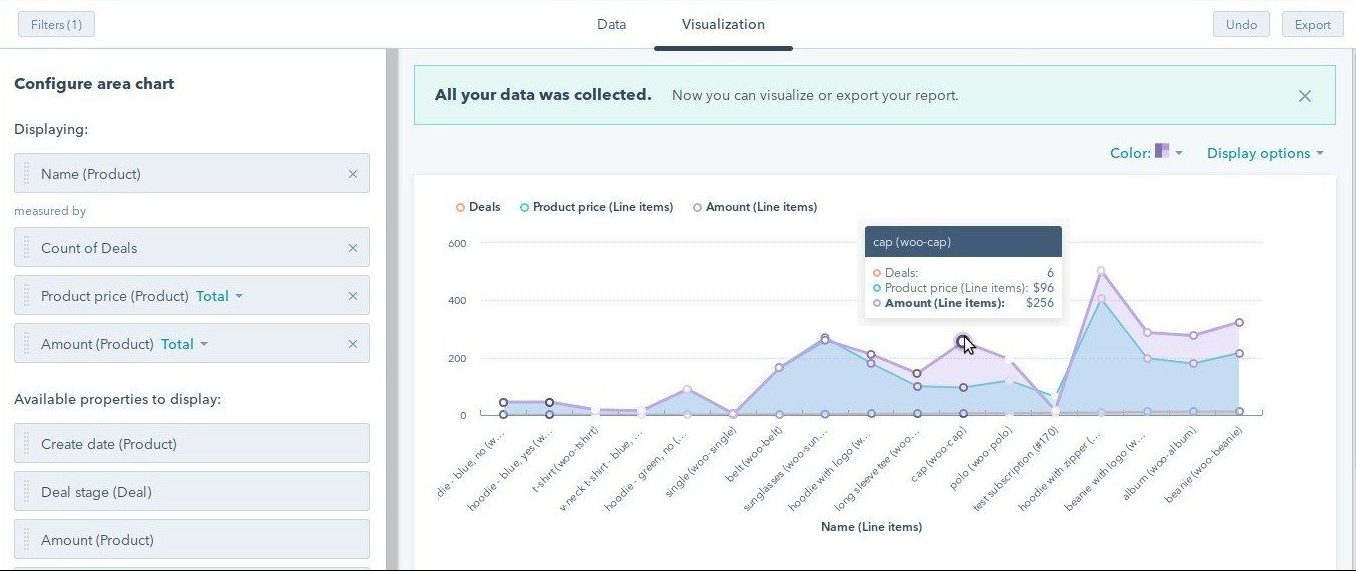
As soon as you start an inbound marketing campaign, you gain access to a data pool. To get a clear picture of what's working and what's not, you get several assets that should be tracked.
You can include landing pages, email templates, website pages, and other content you've attached to your campaign. You can understand and monitor the performance of the deals you close, emails you send, and everything in between with the Reporting dashboard.
The perfect ecommerce combo: WooCommerce and HubSpot
Hopefully, you've learned how to connect WooCommerce to HubSpot. You can utilize HubSpot's sophisticated marketing, CRM and sales features to boost traffic and sales for your WooCommerce store with this awesome integration. With this extension, you can take your Sales, Marketing, and Reporting to the next level, based on the data that matters to your business: the data from your customers.
The IV-Lead team has successfully helped businesses kickstart their WooCommerce sales and marketing automation, so if you're interested in getting started with yours, feel free to contact us here.